Quantcast
Channel: the RPF - Replica Props
Viewing all 13965 articles
Browse latest View live

Treasure Planet Map

$
0
0
Hey guys, I was looking for advice on making a replica of Jim's treasure map from what is one of (imo) one of the greatest movies ever made. Definitely just nostalgia talking there, but never mind.

Judging by this image here:
Click image for larger version. 

Name:	tumblr_inline_njx5tiaKhB1retrjd.jpg 
Views:	23 
Size:	37.5 KB 
ID:	667702
taking jim's face to be about seven inches long (about the length of my face), I would estimate the map to be about Ø5in.
Do you know of any spheres that would be easily sculptable and paintable at around this size? I would maybe go down to Ø4in, but not really larger. I do want this to be ergonomically comfortable.

If I continue with this, I'll be sure to post pics!
Attached Thumbnails
Click image for larger version. 

Name:	tumblr_inline_njx5tiaKhB1retrjd.jpg 
Views:	N/A 
Size:	37.5 KB 
ID:	667702  

noisy cricket

$
0
0
Looking for case for my SD Noisy Cricket


C

Glowing Fungus Nightlight

$
0
0
Name:  110px-Glowing_cave_fungus.png
Views: 90
Size:  21.0 KB

So I'm looking to make a glowing mushroom led lamp. Very Fallout esque, I want to use small section of D&D cave diorama as a base. What I would like to do is include a small puddle of stagnant radioactive water. What would be the best substance for a glowing water effect? My idea now is to use clear cast epoxy either tinted directly or painter over with a thin film of tinted modge podge green with LEDs embedded underneath.
Attached Images
 

Star Trek: Captain Kirk's Bamboo Cannon — Cutaway Build

$
0
0
A few months back I watched the episode 'Arena' of Star Trek TOS when Captain Kirk battles the Gorn in the episode for what is most likely the 15th or 16th time. This time I had an awesome idea for a build.

Click image for larger version. 

Name:	IMG_0411.JPG 
Views:	22 
Size:	156.8 KB 
ID:	667785

This is is the moment I decided to build the cannon Captain Kirk uses to defeat the Gorn, but just taking a piece of bamboo and wrapping some vine seemed to easy. So I decided to take it to an almost hilarious level. I decided to build a cutaway version of the cannon and here's the result.

Click image for larger version. 

Name:	IMG_1151.JPG 
Views:	29 
Size:	559.4 KB 
ID:	667788Click image for larger version. 

Name:	IMG_1152.JPG 
Views:	22 
Size:	561.1 KB 
ID:	667789

I looked at all the things Kirk shoved into the cannon, (coal, diamonds, sulfer, and potassium nitrate). I used quartz in place of the diamonds, used real charcoal, and used colored sand instead of sulfer and PN. The cannon is 3 feet tall, and has a width of about 6", which should be the correct size for the one used on screen.

Click image for larger version. 

Name:	IMG_1153.JPG 
Views:	20 
Size:	709.2 KB 
ID:	667790

To get the vine look of the cannon I wove my own rope from 5 ply twine. I left one of the ropes a little loose so I could hang it from my wall.

Click image for larger version. 

Name:	IMG_1155.JPG 
Views:	20 
Size:	558.1 KB 
ID:	667791Click image for larger version. 

Name:	IMG_1156.JPG 
Views:	19 
Size:	581.8 KB 
ID:	667792

Here's some close ups of the 'diamonds', charcoal, 'potassium nitrate', and 'sulfer'.

Overall I'm really happy with how it came out! I'm thinking I'll start a project run in the next month if anyone would be interested. Thinking the price would be right around $75. Let me know what you guys think!

————————————————
Bonus: While William Shatner was in town for Salt Lake Comic Con I had him sign it, which makes this about 10x cooler in my eyes. :D
Click image for larger version. 

Name:	IMG_1154.JPG 
Views:	18 
Size:	522.7 KB 
ID:	667796

He was pretty confused when I handed him half a bamboo shoot to sign, but once I explained what I was making his exact words were "Oh my god, that fantastic!" Which I can't think of a better compliment than that!
Attached Thumbnails
Click image for larger version. 

Name:	IMG_0411.JPG 
Views:	N/A 
Size:	156.8 KB 
ID:	667785   Click image for larger version. 

Name:	IMG_1153.JPG 
Views:	N/A 
Size:	709.2 KB 
ID:	667790   Click image for larger version. 

Name:	IMG_1151.JPG 
Views:	N/A 
Size:	559.4 KB 
ID:	667788  

Click image for larger version. 

Name:	IMG_1152.JPG 
Views:	N/A 
Size:	561.1 KB 
ID:	667789   Click image for larger version. 

Name:	IMG_1155.JPG 
Views:	N/A 
Size:	558.1 KB 
ID:	667791   Click image for larger version. 

Name:	IMG_1156.JPG 
Views:	N/A 
Size:	581.8 KB 
ID:	667792  

Click image for larger version. 

Name:	IMG_1154.JPG 
Views:	N/A 
Size:	522.7 KB 
ID:	667796  

Quantum Leap First Season Handlink (cheap and nasty electronics)

$
0
0
After I watched the first Season of Quantum Leap in HD I wanted that handlink. As I'm really bad with electronics I aimed for a static version so I ordered smoked acrylic 3mm and clear Acrylic in 6mm. As I have no real dimensions I had to guess a lot.

I made these in Gimp a few years back and I drew them using a very small picture that I found on the internet as reference.
Click image for larger version. 

Name:	Handlink Season 1 14,5 cm hoch front.png 
Views:	18 
Size:	403.6 KB 
ID:	667853Click image for larger version. 

Name:	Handlink Season 1 14,5 cm hoch back.jpg 
Views:	15 
Size:	338.4 KB 
ID:	667854
Since then I found a much better picture and I found that I made some errors on it. But back then I had nothing better to work with. I might have to redo them. Also the Font that used is not the correct one. So if maybe someone has better refence pictures that would really help :)

Then I found online some small battery powered Christmas lights which I thought might fit into the handlink.
Click image for larger version. 

Name:	IMG-20160927-WA0001.jpg 
Views:	15 
Size:	162.4 KB 
ID:	667855Click image for larger version. 

Name:	IMG-20160927-WA0000.jpg 
Views:	19 
Size:	118.0 KB 
ID:	667856
Click image for larger version. 

Name:	IMG-20160927-WA0006.jpg 
Views:	19 
Size:	146.6 KB 
ID:	667857Click image for larger version. 

Name:	IMG-20160927-WA0009.jpg 
Views:	20 
Size:	172.6 KB 
ID:	667858Click image for larger version. 

Name:	IMG-20160927-WA0018.jpg 
Views:	17 
Size:	135.3 KB 
ID:	667859

And now I'm working on a better version of this link as I only had superglue at hand and that doesn't look too good. Still waiting for the acrylic glue :)
Click image for larger version. 

Name:	IMG-20160927-WA0021.jpg 
Views:	16 
Size:	122.0 KB 
ID:	667860
Attached Thumbnails
Click image for larger version. 

Name:	Handlink Season 1 14,5 cm hoch front.png 
Views:	N/A 
Size:	403.6 KB 
ID:	667853   Click image for larger version. 

Name:	Handlink Season 1 14,5 cm hoch back.jpg 
Views:	N/A 
Size:	338.4 KB 
ID:	667854   Click image for larger version. 

Name:	IMG-20160927-WA0001.jpg 
Views:	N/A 
Size:	162.4 KB 
ID:	667855  

Click image for larger version. 

Name:	IMG-20160927-WA0000.jpg 
Views:	N/A 
Size:	118.0 KB 
ID:	667856   Click image for larger version. 

Name:	IMG-20160927-WA0006.jpg 
Views:	N/A 
Size:	146.6 KB 
ID:	667857   Click image for larger version. 

Name:	IMG-20160927-WA0009.jpg 
Views:	N/A 
Size:	172.6 KB 
ID:	667858  

Click image for larger version. 

Name:	IMG-20160927-WA0018.jpg 
Views:	N/A 
Size:	135.3 KB 
ID:	667859   Click image for larger version. 

Name:	IMG-20160927-WA0021.jpg 
Views:	N/A 
Size:	122.0 KB 
ID:	667860  

Assassins Creed Tomahawk

$
0
0
So, this will be my first build i did after a long time of lurking here :)
My girlfriend has her birthday today and i wanted to give her something special. She's a big fan of assassins creed so i decided to use all my knowledge gathered from here and yourtube and build her a real metal tomahawk :)

I started with buying a toy one and took it apart.

Click image for larger version. 

Name:	20160723_122836.jpg 
Views:	13 
Size:	3.76 MB 
ID:	667871

After this i did some alumnium melting like you can find on youtube, a very good video is from the king of random. I however did not use the lost foam cast method.
I made my own greensand and placed the foam axehead in the sand. And for doing something like this for the very first time i got a very good result.

Click image for larger version. 

Name:	20160923_205819.jpg 
Views:	12 
Size:	4.34 MB 
ID:	667872

Some cleanup work had to be done and i had to make room for the wooden handle. Most of this is done by hand (except drilling the slot for the wooden handle). Cleaning this thing up took me roughly 5-6 hours!
Click image for larger version. 

Name:	20160924_121452.jpg 
Views:	15 
Size:	3.67 MB 
ID:	667873Click image for larger version. 

Name:	20160924_144831.jpg 
Views:	10 
Size:	3.26 MB 
ID:	667874

After getting this done i was ready to shape the wood and fit it into the axe head :)

Click image for larger version. 

Name:	20160924_144842.jpg 
Views:	10 
Size:	3.61 MB 
ID:	667875Click image for larger version. 

Name:	20160926_230945.jpg 
Views:	10 
Size:	3.81 MB 
ID:	667876

Time to weather the hell out of this one ^^

Click image for larger version. 

Name:	20160926_233421.jpg 
Views:	11 
Size:	4.39 MB 
ID:	667877

Then up to wrapping the leather straps. This was hell! I've never worked with real leather and i used a contact glue but it got messy real quick. I cleaned it up as good as i could and this is the result :)

Click image for larger version. 

Name:	20160927_202457.jpg 
Views:	16 
Size:	3.90 MB 
ID:	667878

Now the only thing left to do is present it to her this evening and hopefully she'll like it :)
Attached Thumbnails
Click image for larger version. 

Name:	20160927_202457.jpg 
Views:	N/A 
Size:	3.90 MB 
ID:	667878   Click image for larger version. 

Name:	20160926_233421.jpg 
Views:	N/A 
Size:	4.39 MB 
ID:	667877   Click image for larger version. 

Name:	20160926_230945.jpg 
Views:	N/A 
Size:	3.81 MB 
ID:	667876  

Click image for larger version. 

Name:	20160924_144842.jpg 
Views:	N/A 
Size:	3.61 MB 
ID:	667875   Click image for larger version. 

Name:	20160924_144831.jpg 
Views:	N/A 
Size:	3.26 MB 
ID:	667874   Click image for larger version. 

Name:	20160924_121452.jpg 
Views:	N/A 
Size:	3.67 MB 
ID:	667873  

Click image for larger version. 

Name:	20160923_205819.jpg 
Views:	N/A 
Size:	4.34 MB 
ID:	667872   Click image for larger version. 

Name:	20160723_122836.jpg 
Views:	N/A 
Size:	3.76 MB 
ID:	667871  

New Diorama Launch

$
0
0
This Cave looks amazing in details
Order Details: www.magnum-toys.com / Facebook: Magnum Toys HK

THE CAVE includes:
Detailed wall diorama
  • Display base
  • Tool set
  • Lifting tool set
  • Movable wodden crate
  • Shine light
  • Wreckage accessories

Dimensions: 39 cm (h) x 36 cm (w)
Suitable for 1:6 figures
Click image for larger version. 

Name:	1f1950_69efaa39fd7b47bb860455d9e2aac9f9~mv2.jpg 
Views:	29 
Size:	85.9 KB 
ID:	667881Click image for larger version. 

Name:	1f1950_dbfdeb404f7540e0b87f2bf4b6242cee~mv2.jpg 
Views:	28 
Size:	79.0 KB 
ID:	667882Click image for larger version. 

Name:	1f1950_41580217bb5543e0bae0c2a74adf5690~mv2.jpg 
Views:	24 
Size:	87.2 KB 
ID:	667883Click image for larger version. 

Name:	1f1950_b6bf87434a984420bf4431bbbe30f256~mv2.jpg 
Views:	20 
Size:	73.6 KB 
ID:	667884Click image for larger version. 

Name:	1f1950_6b6ab4aa84f545c397095199b19fd39d~mv2_d_2480_3508_s_4_2.jpg 
Views:	15 
Size:	103.8 KB 
ID:	667885
Attached Thumbnails
Click image for larger version. 

Name:	1f1950_69efaa39fd7b47bb860455d9e2aac9f9~mv2.jpg 
Views:	N/A 
Size:	85.9 KB 
ID:	667881   Click image for larger version. 

Name:	1f1950_41580217bb5543e0bae0c2a74adf5690~mv2.jpg 
Views:	N/A 
Size:	87.2 KB 
ID:	667883   Click image for larger version. 

Name:	1f1950_dbfdeb404f7540e0b87f2bf4b6242cee~mv2.jpg 
Views:	N/A 
Size:	79.0 KB 
ID:	667882  

Click image for larger version. 

Name:	1f1950_b6bf87434a984420bf4431bbbe30f256~mv2.jpg 
Views:	N/A 
Size:	73.6 KB 
ID:	667884   Click image for larger version. 

Name:	1f1950_6b6ab4aa84f545c397095199b19fd39d~mv2_d_2480_3508_s_4_2.jpg 
Views:	N/A 
Size:	103.8 KB 
ID:	667885  

My Larger DW props

$
0
0
I don't take many pictures of my larger DW props because it is hard to find good settings for them. I've put together some compilations of images of my Dalek Sec and K9 replicas taken from various exhibitions and fundraising events that they have been to (K9 also got to meet John Leeson!).


Worbla On Wooden Bow

$
0
0
Hi everyone!

i think I may have posted in the wrong forum section.
i was wondering if worbla would be useable on a wooden
functional bow.

thank you

Using Worbla On Wooden Bow

$
0
0
Hi Everyone

i was currently working on a bow project for my tomb raider bow prop and was wondering if I could use worbla to a functional wooden bow?
my concerns are that it will fall of the wood.

i figured I'd ask as I'm sure someone here has used worbla on wood.

thank you

Display for Noisy Cricket

$
0
0
Guys I have an SD Noisy cricket and am looking for a Display Case with a plaque.

C

Prop that was purchased was confiscated by US Border patrol

$
0
0
A friend of mine purchased an obviously fake Hellboy gun prop that was created by an artist in Italy. When they tried to ship it to them it was confiscated. They received a letter from the US government stating that it was against the law to deliver and that they had three options. One is to write a letter as to the situation and describe in detail why, what, when etc... Two abandon the property or three is to pay a fee or go to court. Has anybody had this happen to them? Any advice on how my friend can get the prop released and delivered without any legal issues?

Thanks

Anyone doing twelfth doctor universal remote mods?

$
0
0
As the title asks, is anyone doing modifications to the wand company's twelfth doctor sonic screwdriver universal remote to make it more screen accurate? For example, solid claws, new emmiter, copper rivets, or leather handle with accurate switch? I've tried Kursosawa but haven't been able to get a reply.

Lord Marshal helmet from Chronicles of Riddick! Paint and write-up.

$
0
0
Hey folks, I recently picked up a Lord Marshal helmet from Casey McCabe. I'm told that it originates from a pre-production piece, and judging by the fantastic sculpture work there is no mistakes about it. Miles' work is just out of this world! Of course with everything I post, I try to grab photos along the way to provide somewhat of a write up.


This particular piece came already trimmed, and all I had to do was touch up the seam. Casey did a fantastic job both molding and casting this so the clean up was a breeze. This thing is a tank, and without a doubt the best resin piece I've ever owned. Here is a photo I got from him.
Click image for larger version. 

Name:	image.jpeg 
Views:	18 
Size:	786.8 KB 
ID:	668178


It was primed using some Bondo Hotrod Black filler primer, and then lightly gone over with a scotchbrite pad to knock down any unwanted texture.
I base coated the piece with a dark metal paint, Magnetic Steel, or something to that effect. I let the base dry over night, and then I could begin the process of adding the metal tones and color texture to the piece.

The metal tones come from a product called Shrapnel from Imperial Surface Technologies. I used two shades of Shrapnel, one right out of the can and one toned down with some gun metal paint. I sprayed these two tones, and a straight matte black, on in very spatter-y layers through my HVLP gun. The goal was to let all these different tones come together and mix on the surface to get an organic metal look. I was really happy with the results. You can see just how messy it made my little spray booth.. Not as happy about that!!

Here we can see it with the metal tones applied and the wonderful product that made it happen! A side note, I've used a LOT of metal paints.. Nothing even comes close to the stuff Imperial Surface puts out. It is really the best paint on the market, and there is a reason why all the professionals use it. ;)

The spray booth lighting washed out my phone pretty bad and I didn't realize it for a while so you'll have to forgive the bad photos!!
Click image for larger version. 

Name:	image.jpeg 
Views:	24 
Size:	1.94 MB 
ID:	668171
A close up of the metal tones. The spatter technique works really well for me as I'm a huge fan of the natural and organic breakup.
Click image for larger version. 

Name:	image.jpeg 
Views:	30 
Size:	3.62 MB 
ID:	668172

For my next step, I went in and started to add the brass tones to the upper helmet, as well as in certain spots on the face plates. The goal was to keep the brass tones very thin to allow all those metal tones to peek through. I don't have the greatest photos of this step but hopefully it shows what I mean.
This is also when I began to add the more aluminum dry brushed tones to the faceplates. There is very subtle blues, pinks, reds, and purples lightly mottled on the dome as well.
Click image for larger version. 

Name:	image.jpeg 
Views:	23 
Size:	2.34 MB 
ID:	668174

Here you can see where I've begun to map out the green patina tones on the upper helmet and fins.
Click image for larger version. 

Name:	image.jpeg 
Views:	21 
Size:	2.74 MB 
ID:	668175
From there I went in and did a little more dry brushing around the face, as well as added more brass high lights here and there. The whole helmet was shaded with some shading grey to help the sculpture pop out a little more as well.
Click image for larger version. 

Name:	image.jpeg 
Views:	21 
Size:	1.13 MB 
ID:	668176

Finally, I sealed the whole piece with an automotive clear, and began applying the gold leaf! Now there are quite a few different helmets each with different paint jobs out there. I couldn't tell you which one(s) were on screen and which weren't. Personally I really liked the look of the Propstore London helmet and that's what I aimed for with this one, so gold leaf was a necessity! So here is the finished piece! I added the gold leaf and did some final painting. Painting on and around the gold leaf, adding more patina, and highlighting the faces with silver Rub-N-Buff for example. It was a very rainy and over cast day when I grabbed the photos, so you'll have to take my work when I say the faceplate is a lot more metallic than it looks!
Click image for larger version. 

Name:	image.jpeg 
Views:	30 
Size:	1.15 MB 
ID:	668177

So I hope you guys enjoy! I also hope you learn something! It was a very fun project, and in the end a pretty simple paint job. Just a whole lot of layers! I've got a spray booth to clean, so I'll catch ya guys next time! :lol
Attached Thumbnails
Click image for larger version. 

Name:	image.jpeg 
Views:	N/A 
Size:	1.94 MB 
ID:	668171   Click image for larger version. 

Name:	image.jpeg 
Views:	N/A 
Size:	3.62 MB 
ID:	668172   Click image for larger version. 

Name:	image.jpeg 
Views:	N/A 
Size:	2.21 MB 
ID:	668173  

Click image for larger version. 

Name:	image.jpeg 
Views:	N/A 
Size:	2.34 MB 
ID:	668174   Click image for larger version. 

Name:	image.jpeg 
Views:	N/A 
Size:	2.74 MB 
ID:	668175   Click image for larger version. 

Name:	image.jpeg 
Views:	N/A 
Size:	1.13 MB 
ID:	668176  

Click image for larger version. 

Name:	image.jpeg 
Views:	N/A 
Size:	1.15 MB 
ID:	668177   Click image for larger version. 

Name:	image.jpeg 
Views:	N/A 
Size:	786.8 KB 
ID:	668178  

My Star Trek NOMAD prop and diorama

$
0
0
Hello everyone. I recently finished a year-long NOMAD project build and wanted to share it with you. The prop itself features lights and sounds and many different lighting options for the diorama.

Took it (and a Captain's chair I did earlier this year) to the 50th Anniversary Star Trek convention in Cherry Hill, NJ last month. We had a great time meeting some of the Next Gen cast and a ton of fans. Was hoping William Shatner would swing through the Grand Ballroom where we were set up but we heard after signing 400 autographs, he soon departed. As would I probably. Sean Kenney (Capt. Pike) did stop by and sit in the chair and chat. He was a nice guy and very gracious guest. Did anyone else here attend?

Enjoy!

:)

Jon


Click image for larger version. 

Name:	DSCF2569a.jpg 
Views:	47 
Size:	98.9 KB 
ID:	668331Click image for larger version. 

Name:	DSCF2582a.jpg 
Views:	49 
Size:	193.1 KB 
ID:	668332Click image for larger version. 

Name:	DSCF2595a.JPG 
Views:	67 
Size:	225.8 KB 
ID:	668334Click image for larger version. 

Name:	DSCF2604a.jpg 
Views:	59 
Size:	203.4 KB 
ID:	668335Click image for larger version. 

Name:	20160828_094024.jpg 
Views:	55 
Size:	66.5 KB 
ID:	668339
Attached Thumbnails
Click image for larger version. 

Name:	DSCF2595a.JPG 
Views:	N/A 
Size:	225.8 KB 
ID:	668334   Click image for larger version. 

Name:	DSCF2582a.jpg 
Views:	N/A 
Size:	193.1 KB 
ID:	668332   Click image for larger version. 

Name:	DSCF2569a.jpg 
Views:	N/A 
Size:	98.9 KB 
ID:	668331  

Click image for larger version. 

Name:	DSCF2604a.jpg 
Views:	N/A 
Size:	203.4 KB 
ID:	668335   Click image for larger version. 

Name:	20160828_094024.jpg 
Views:	N/A 
Size:	66.5 KB 
ID:	668339  

One Eyed Willy Bandana - Anyone know the pattern?

$
0
0
Hi All

Making a one eyed Willy replica and unsure of the bandana - I have read threads about it before here but I cant locate them, or the images are dead links..

I recall it being difficult to nail down, but someone found one that was close enough!

Thank you!

Tyler

PS - Here it is so far - The base is a skull from a dental supply company!

Click image for larger version. 

Name:	Screen Shot 2016-09-29 at 11.27.26 AM.png 
Views:	15 
Size:	2.13 MB 
ID:	668388
Attached Thumbnails
Click image for larger version. 

Name:	Screen Shot 2016-09-29 at 11.27.26 AM.png 
Views:	N/A 
Size:	2.13 MB 
ID:	668388  

Oblivion Inspired Office Build

$
0
0
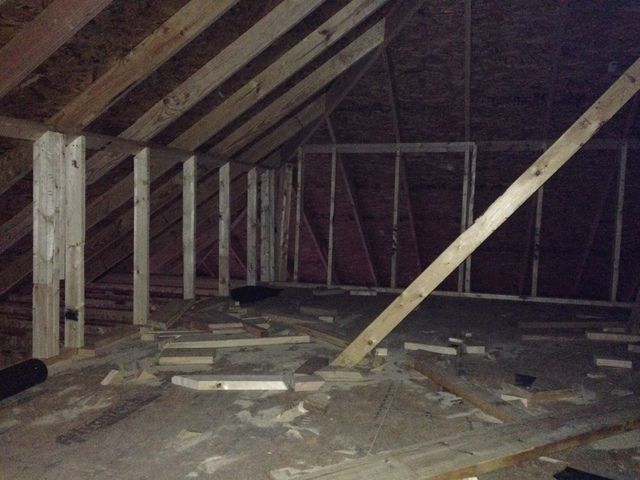
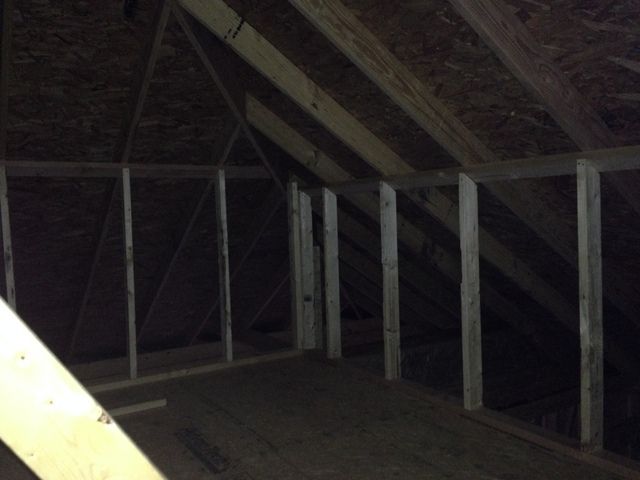
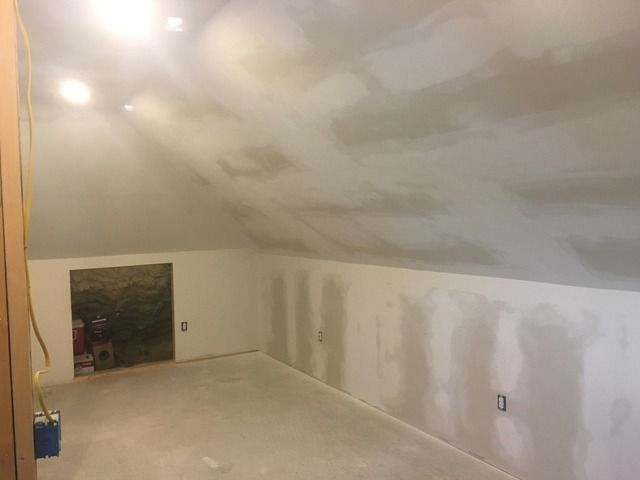
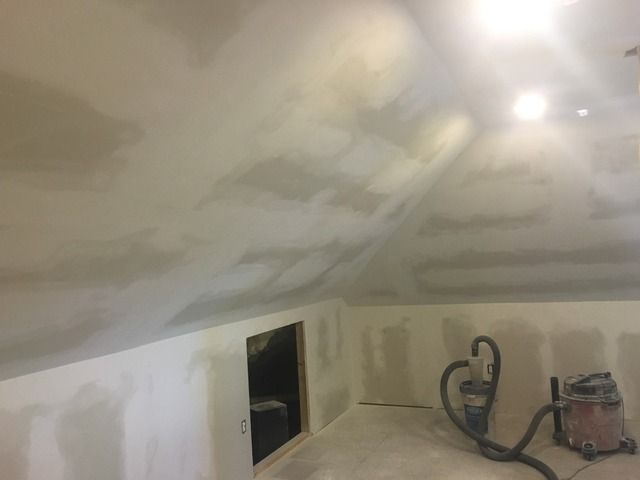
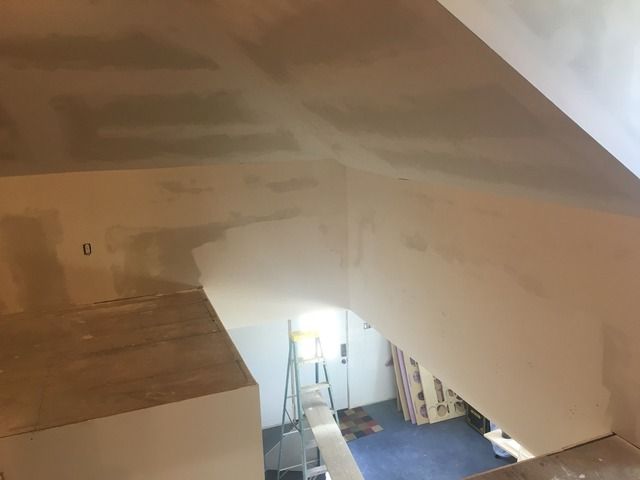
I have been spending the bulk of my time lately working on finishing out my shop. I had the exterior built. Then I have gone back and done all the electrical, insulation, drywall, etc... There is a loft above the work area that I am converting into an office area/ clean space to work on projects that I didn't want to drag through a mountain of sawdust and wet paint.

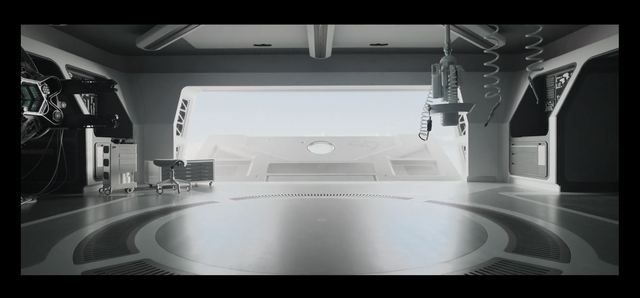
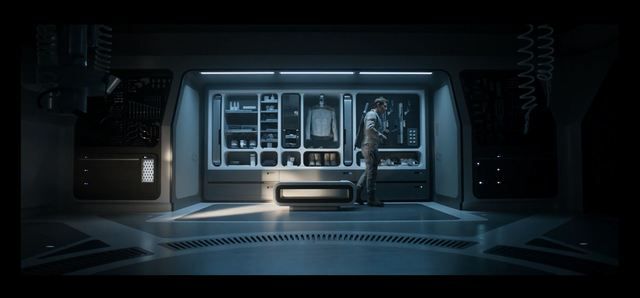
I went through a lot of different ideas about how to finish it. Where I originally thought about making it a Star Wars type space, I didn't want it to look like the set of a movie. I was more concerned about resale, etc... when it came time to sell the place. I was always drawn to the Skytower set from Oblivion. It had all the design from a sc-fi film, but it was all very realistic and usable space at the same time.

Unfortunately, my space won't be surrounded by windows with beautiful views and, since this is a shop, it won't be as "antiseptic" of an environment either. I combed through the original concept art and took some screen grabs and decided to replicate the shop space in the Skytower. It had darker colors and fewer windows. I don't know if I'll replicate anything exactly from the movie, but I will take all my design cues from it.

Here is what I started with:


And where I want to be:


I am far enough along with the drywall that I am now at a point where I have something to share.


Thanks,

-Eric

Whom to commission for a custom prop build?

$
0
0
Hi all -
Not sure if this is the right place to post, would like to commission a prop build of a hero working Space:1999 commlock. Any trustworthy recommendation welcome. Thanks!

Help with brass screws

$
0
0
I for the life of me can not find the correct size of screws that I need in brass.

I am rebuilding a knife and the old screws are the best that I can figure roughly a #4 3/8" course thread machine screw philips with a oval head. Which I can't even find those in the first place to replace the two messed up ones that I do have let alone the same screw in brass. The closest I have gotten is a #4 1/2" slotted wood screw with a round head that I would have to cut and it still may not work.

Any suggestions where to look?

Repairing resin props

$
0
0
Hi all, I had a quick search but couldn't find anything. I have a resin mask that has a few pin holes etc in it that I need to fill and repair before I can look at painting, am I right in saying milliput is the best thing to use?

many thanks all

regards Paul
Viewing all 13965 articles
Browse latest View live